




Uncategorized
How to Clean an Acoustic Tube Earpiece: The Professional Maintenance Guide
Sep
Could a tiny bubble of condensation be the difference between a successful operation and a total communication blackout? For security professionals, distorted audio or a sudden drop in volume isn’t just an annoyance; it’s a tactical risk. Learning how to clean acoustic tube earpiece components is the most effective way to prevent these failures before they occur. You’ve likely felt that familiar itch in your ear canal or struggled to hear a dispatch through muffled static, but these issues rarely mean your radio is faulty.
We understand that maintaining high-stakes equipment requires precision and the right technical knowledge. This guide will help you restore crystal-clear audio, improve ear hygiene, and significantly extend the lifespan of your kit. We’ll walk you through the professional soak method, the best tools for clearing blockages, and the essential signs that your tube needs a full replacement rather than a scrub. By the end, you’ll have the expertise to keep your communications sharp and your ears healthy.
Key Takeaways
- Identify how earwax, sweat, and dust create physical blockages that dampen sound waves and compromise your communication clarity.
- Master the professional step-by-step method on how to clean acoustic tube earpiece parts without damaging the sensitive transducer or quick-release connectors.
- Solve sudden audio dropouts by learning to clear condensation bubbles caused by temperature shifts between your body and the environment.
- Recognise when cleaning isn’t enough and adhere to the industry-standard replacement cycle of 3 to 4 months for professional users.
Why Regular Maintenance of Your Acoustic Tube is Essential
The acoustic tube represents the most vulnerable component in any covert surveillance kit. It serves as the final, critical link in the communication chain, yet it’s the part most frequently exposed to environmental hazards and the human body. Over time, earwax, sweat, and fine dust particles migrate into the narrow passage. These elements create dense physical blockages that significantly dampen sound waves before they reach your ear. Many professionals ask how to clean acoustic tube earpiece kits effectively, but the first step is understanding why the process is necessary. We define acoustic tube hygiene as a critical factor for signal integrity; neglecting this leads to equipment failure when you need it most. Because the tube is a consumable item, regular inspection is mandatory to prevent the gradual degradation of audio quality that occurs during long shifts.
Audio Clarity and Signal Integrity
In high-pressure security environments, muffled audio leads to dangerous miscommunication. Professional kits utilise acoustic tube technology to transmit sound through a column of air. Any obstruction, like a tiny condensation bubble, disrupts the air pressure. This results in distorted signals or “dead” audio. Learning how to clean acoustic tube earpiece sets is the only way to ensure the air path remains clear for instructions.
Health and Hygiene Standards for Security Professionals
Poor maintenance correlates with dermatological issues. Extended shifts create a warm environment where bacteria thrive, leading to otitis externa. To maintain professional standards, follow these rules:
- Replace tubes immediately if equipment is shared between operators.
- Sanitise ear tips daily to prevent pathogen buildup.
- Inspect for yellowing, which indicates bacteria accumulation.
Whilst cleaning helps, your health depends on keeping components sterile. A clean tube ensures you stay focused on the task, not on a painful ear infection.
Step-by-Step Guide to Cleaning Your Acoustic Tube Earpiece
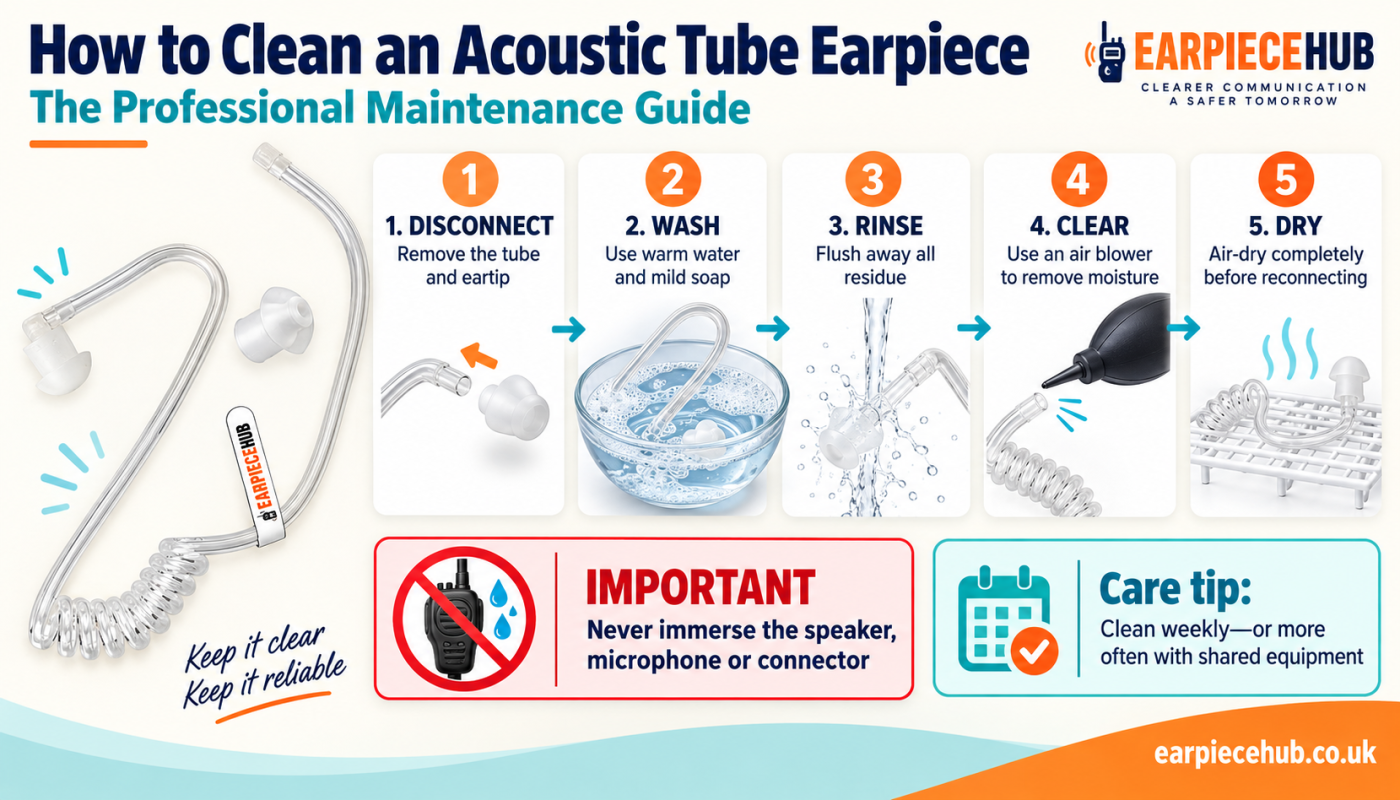
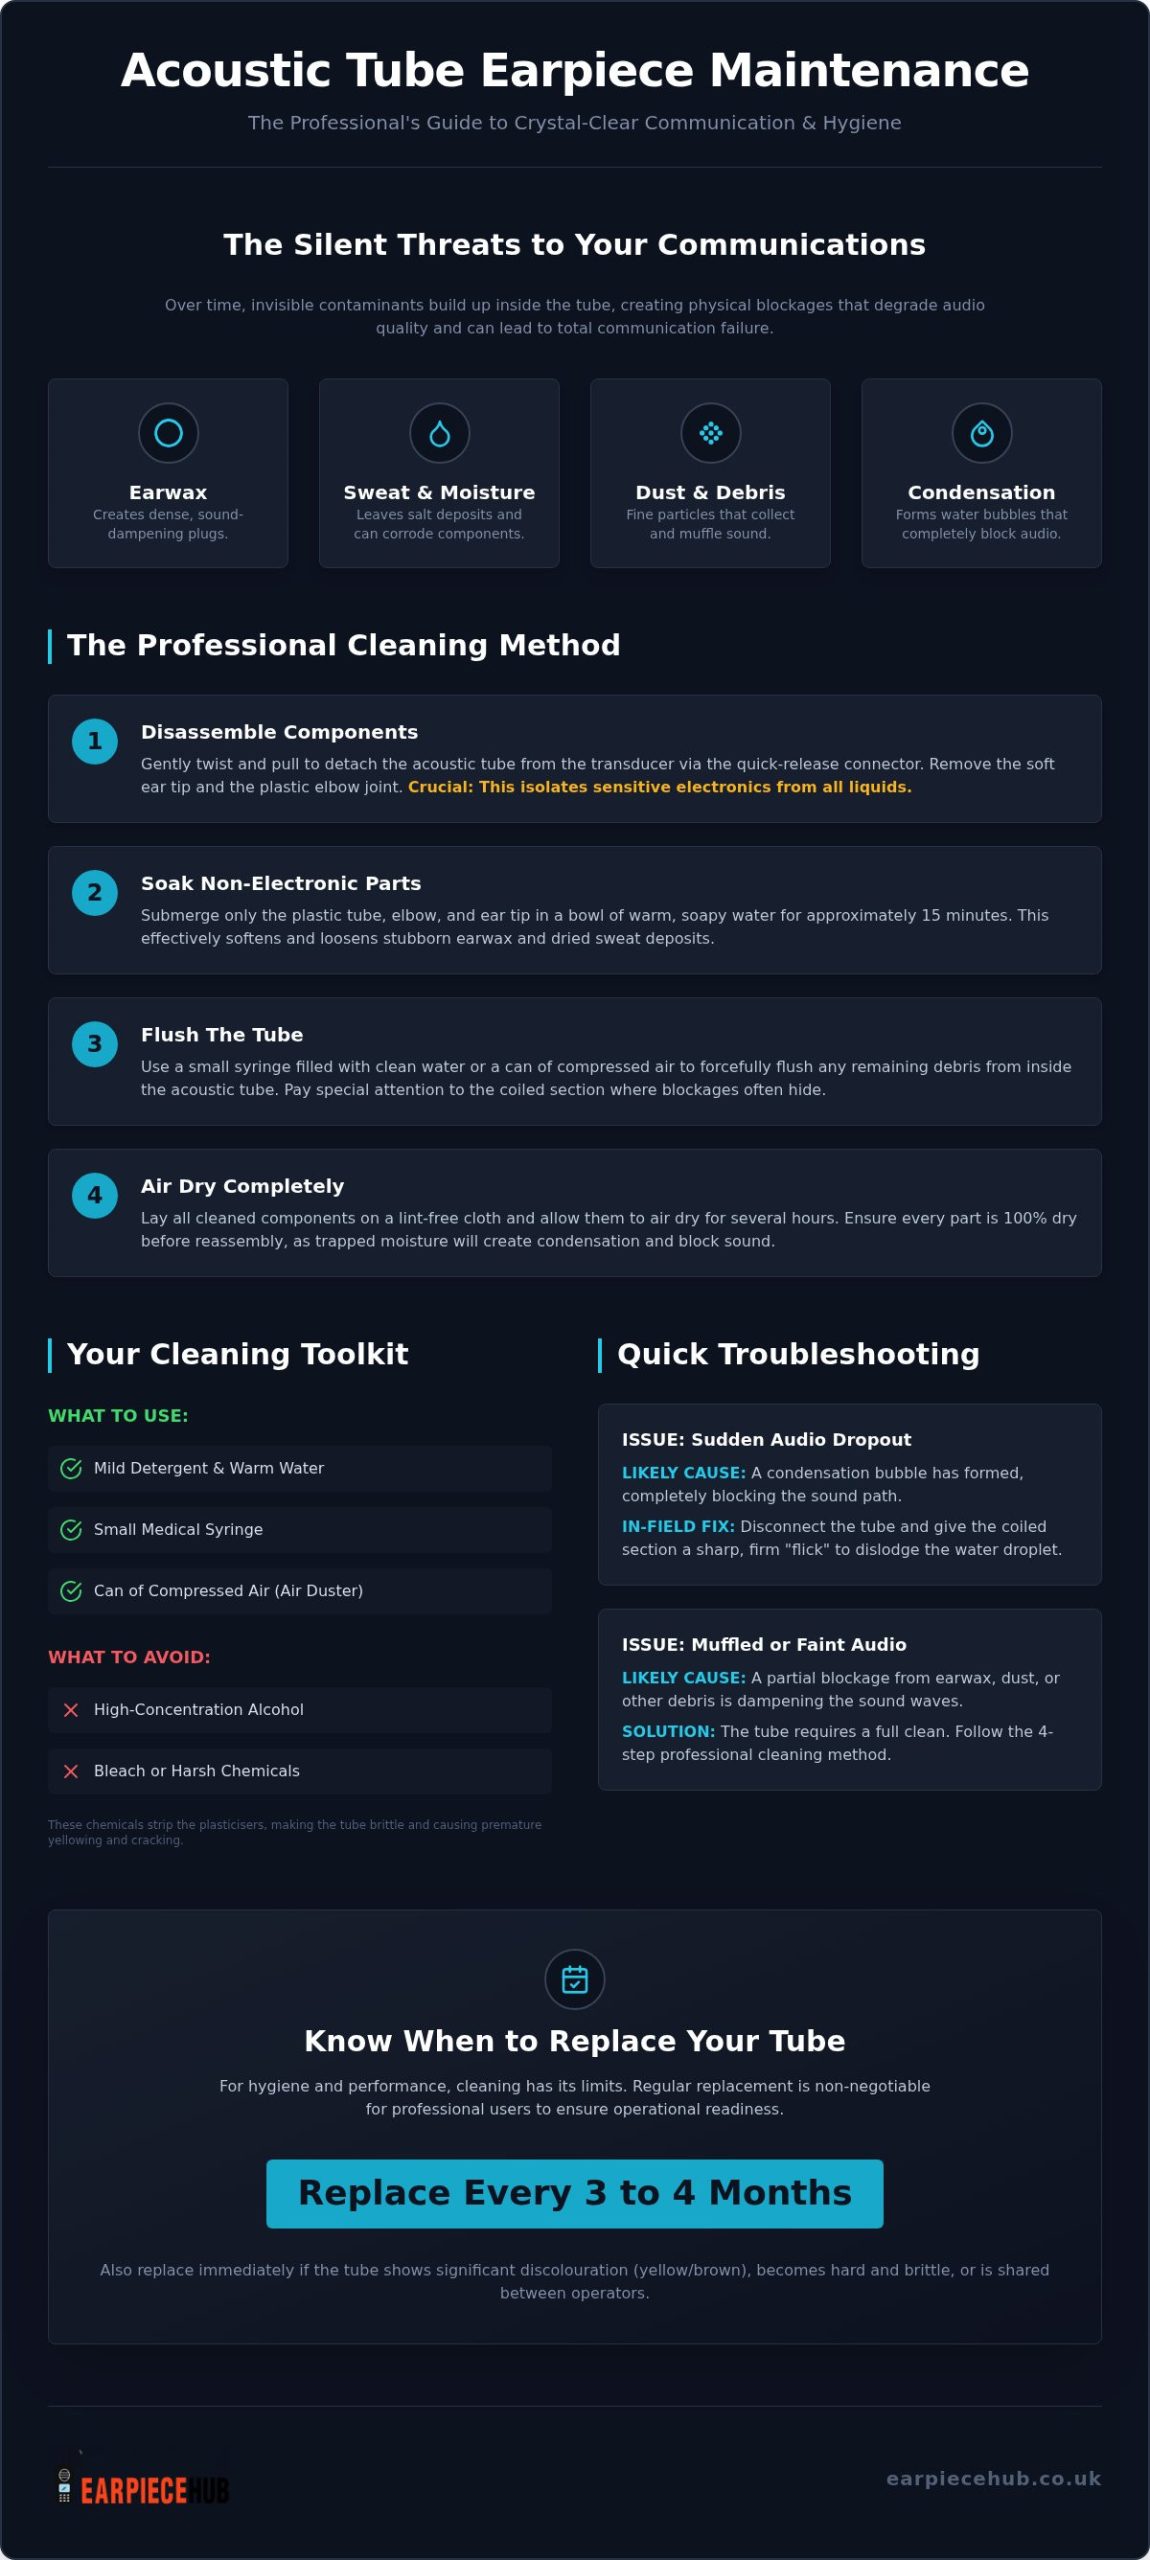
Mastering how to clean acoustic tube earpiece components involves a systematic approach to prevent accidental damage. First, disassemble the tube from the electronic transducer by rotating the quick-release connector. This step is vital to isolate the sensitive electronics from the cleaning fluids. Next, carefully remove the ear tip and the plastic elbow, often called the “jet,” from the tube ends. Submerge these non-electronic plastic components in warm, soapy water for approximately 15 minutes. This softens stubborn earwax and salt deposits from sweat. Finally, use a syringe or air duster to flush the internal channel, forcing out any loosened debris from the coiled section.
The Professional Cleaning Kit
Professional maintenance requires specific tools to reach the interior of the narrow coil. Your kit should include mild detergent, warm water, a small medical syringe, and a can of compressed air. Avoid using high-concentration alcohol or bleach, as these harsh chemicals strip the plasticisers from the medical-grade plastic, making the tube brittle and prone to yellowing. If your current gear is beyond a simple wash, you can find high-quality replacement acoustic tubes and ear tips to ensure your setup remains reliable.
Disassembly and Reassembly Best Practices
Handle the “elbow” connector with precision. Instead of pulling directly, which risks tearing the silicone, use a gentle twisting motion to break the seal. Reassembly is only safe once every component is 100% dry. Moisture trapped in the tube creates “bubbles” that block sound and can eventually corrode the radio’s internal pins. Leave the parts to air dry naturally on a lint-free cloth for several hours. Use your air duster one final time to clear any residual droplets from the elbow joint before snapping the quick-release connector back into place. Proper reassembly ensures the airtight seal needed for clear audio.
Troubleshooting Common Issues: Condensation and Blockages
Sudden audio failure often stems from physical obstructions rather than electronic faults. Condensation forms when warm air from your ear canal meets the cooler surface of the tube, creating small water droplets. Bubbles kill your audio. These droplets act as a physical plug, completely blocking the sound path and resulting in “dead” audio. If you are struggling with how to clean acoustic tube earpiece kits whilst on duty, a quick, sharp “flick” of the coiled section can often displace the moisture. For a more thorough fix during a break, use a burst of compressed air to clear the line entirely. Discolouration is another persistent issue. Constant UV exposure and skin oils eventually turn clear plastic yellow or brown. This change indicates that the medical-grade plastic is beginning to break down chemically.
Managing Moisture in the Field
Door supervisors frequently encounter condensation when moving between cold exteriors and warm club interiors. This rapid temperature shift is the primary catalyst for moisture buildup. Using a tube clip helps to organise the cable and prevents “low spots” where water can pool and create blockages. If you find yourself constantly clearing bubbles, it’s a sign that your environment is too humid for the current tube’s age. Knowing how to clean acoustic tube earpiece components helps, but environmental management is equally vital.
Restoring Discoloured or Hardened Tubes
Surface dirt can be washed away, but deep yellowing usually means the plastic has chemically degraded. Brittle tubes lose their flexibility and develop micro-cracks, which cause audio leaks. If your tube feels stiff or has turned a dark amber colour, cleaning won’t restore its performance. At this stage, the plastic is prone to snapping, causing an immediate loss of signal. To maintain professional standards, buy replacement acoustic tubes and ear tips once discolouration becomes permanent.
Knowing When to Replace Your Acoustic Tube and Components
Cleaning extends the life of your gear, but it isn’t a permanent solution. For professional or rental settings, the industry standard is to replace the acoustic tube every 3 to 4 months. This ensures both performance and hygiene are never compromised. You’ll know it’s time for a change when you notice permanent discolouration or browning that a soak won’t remove. Loss of flexibility is another critical indicator; a hardened tube won’t carry sound waves effectively and is prone to cracking. If you’ve mastered how to clean acoustic tube earpiece sets but still experience persistent muffled audio, the material has likely reached the end of its functional life.
Essential Replacement Parts Checklist
Regularly auditing your kit prevents sudden failure. Start with the mushroom ear tip. Inspect it for tears or wax saturation that restricts the aperture. These tips are in direct contact with your ear canal and should be replaced more frequently than the tube itself for dermatological safety. Next, check the twist connector. It must provide an airtight, secure fit to the transducer to prevent signal leakage. If the connection feels loose, the plastic has warped. You can browse replacement acoustic tubes and ear tips to restore your equipment’s factory-standard performance.
Maintaining Peak Communication Reliability
Reliability in security operations relies on the “Clean, Inspect, Replace” cycle. Daily cleaning prevents wax buildup, whilst weekly inspections help you spot the early signs of chemical degradation. Don’t wait for a total communication failure during a critical incident to address worn-out parts. Proactive replacement of your acoustic tube and ear tips is the most cost-effective way to maintain signal integrity. Whether you need spares for Motorola or Kenwood radios, we provide the specialist components required for high-stakes environments. Upgrade your communication gear at Earpiece Hub today to ensure you never miss a vital dispatch.
Maintain Signal Integrity and Professional Standards
Professional communication demands equipment that performs under pressure. By mastering how to clean acoustic tube earpiece components, you ensure that every dispatch is heard clearly whilst protecting your health from ear canal irritations. Regular maintenance prevents the physical blockages and condensation bubbles that lead to critical audio failure. Don’t let a yellowed or brittle tube compromise your safety on shift. When cleaning is no longer effective, proactive replacement is the only way to guarantee reliability.
Earpiece Hub has been trusted by security professionals across the UK since 2015. We provide specialist support for Motorola, Hytera, and Kenwood systems, with next-day shipping available for your most urgent gear requirements. Whether you need a single spare or a bulk order for your team, we have the technical expertise to keep you connected. Shop Replacement Acoustic Tubes and Ear Tips today to refresh your kit. Stay sharp, stay safe, and keep your communications crystal clear.
Frequently Asked Questions
How often should I clean my acoustic tube earpiece?
You should wipe down the exterior ear tip after every shift and perform a deep internal clean once a week. Because these components sit inside your ear canal, daily sanitisation prevents bacteria buildup and painful infections. If you work in high-dust environments or high-temperature settings, you might need to increase this frequency. Regular maintenance is the only way to ensure your signal remains clear and your equipment stays functional.
Why is there no sound coming from my earpiece even though the radio is on?
The most common cause of “dead” audio is a physical blockage within the tube. Check for earwax at the ear tip or a small condensation bubble in the coil. These tiny obstructions act as a plug, stopping sound waves from reaching your ear. Before assuming the electronics are faulty, disconnect the tube and check the transducer for sound. Learning how to clean acoustic tube earpiece components often solves this issue instantly.
Can I use alcohol wipes to clean the clear tube?
You should only use alcohol wipes on the removable silicone ear tip, never on the clear acoustic tube itself. Harsh chemicals and high-concentration alcohol strip the plasticisers from the medical-grade plastic. This causes the tube to turn yellow, harden, and eventually snap. For the tube, stick to warm, soapy water and a thorough air dry. This preserves the flexibility required for comfortable, long-term covert surveillance use during your shift.
What is the best way to remove condensation from inside the earpiece tube?
Using a can of compressed air is the most efficient method for clearing moisture. Disconnect the tube from the transducer and blow a short burst of air through the channel to expel any droplets. If you don’t have an air duster, you can use a medical syringe to force air through. Ensure the tube is completely dry before reconnecting it, as residual moisture can damage the radio’s sensitive internal pins.
How do I know if I need a new acoustic tube or a new ear tip?
You need a new ear tip if the mushroom shape is torn or permanently saturated with wax. For the tube, look for permanent yellowing, stiffness, or micro-cracks. Professional users should follow the industry standard of replacing the tube every 3 to 4 months. If you’ve researched how to clean acoustic tube earpiece parts and the sound remains muffled after a wash, the material has likely degraded beyond repair.
