




Uncategorized
The Ultimate Guide to Covert Acoustic Tube Earpieces for Professionals in 2026
Aug
What if the only thing standing between a successful operation and a total security breach is a single millimetre of condensation trapped inside your equipment? For security professionals, a covert acoustic tube earpiece is far more than a simple accessory; it’s a vital lifeline that must perform without fail. You’ve likely dealt with the frustration of muffled sound from a blocked tube or the physical ache of a poorly fitted ear tip during a long shift. It’s a common struggle, and in high-stakes environments, these technical glitches are more than just an inconvenience.
We understand that reliability is non-negotiable when you’re on the frontline. This guide promises to help you master the technical nuances of your gear, from selecting the correct 1 Wire, 2 Wire, or 3 Wire wiring configuration to ensuring perfect connector compatibility with your Motorola or Hytera radios. We will examine the essential maintenance steps to keep your audio crystal-clear and help you choose the right replacement parts to extend the life of your equipment. By the end, you’ll have the technical expertise to maintain seamless communication in any professional setting.
Key Takeaways
- Master the technical distinctions between 1-wire, 2-wire, and 3-wire systems to select the optimum wiring architecture for your specific security role.
- Prevent critical audio failure by implementing a professional care routine for your covert acoustic tube earpiece to clear moisture and debris.
- Ensure seamless radio integration by identifying the exact connector types and pin spacings required for Motorola, Kenwood, and Hytera equipment.
- Extend the operational life of your gear by learning how to identify and resolve tube blockages before they impact your communication.
What is a Covert Acoustic Tube Earpiece?
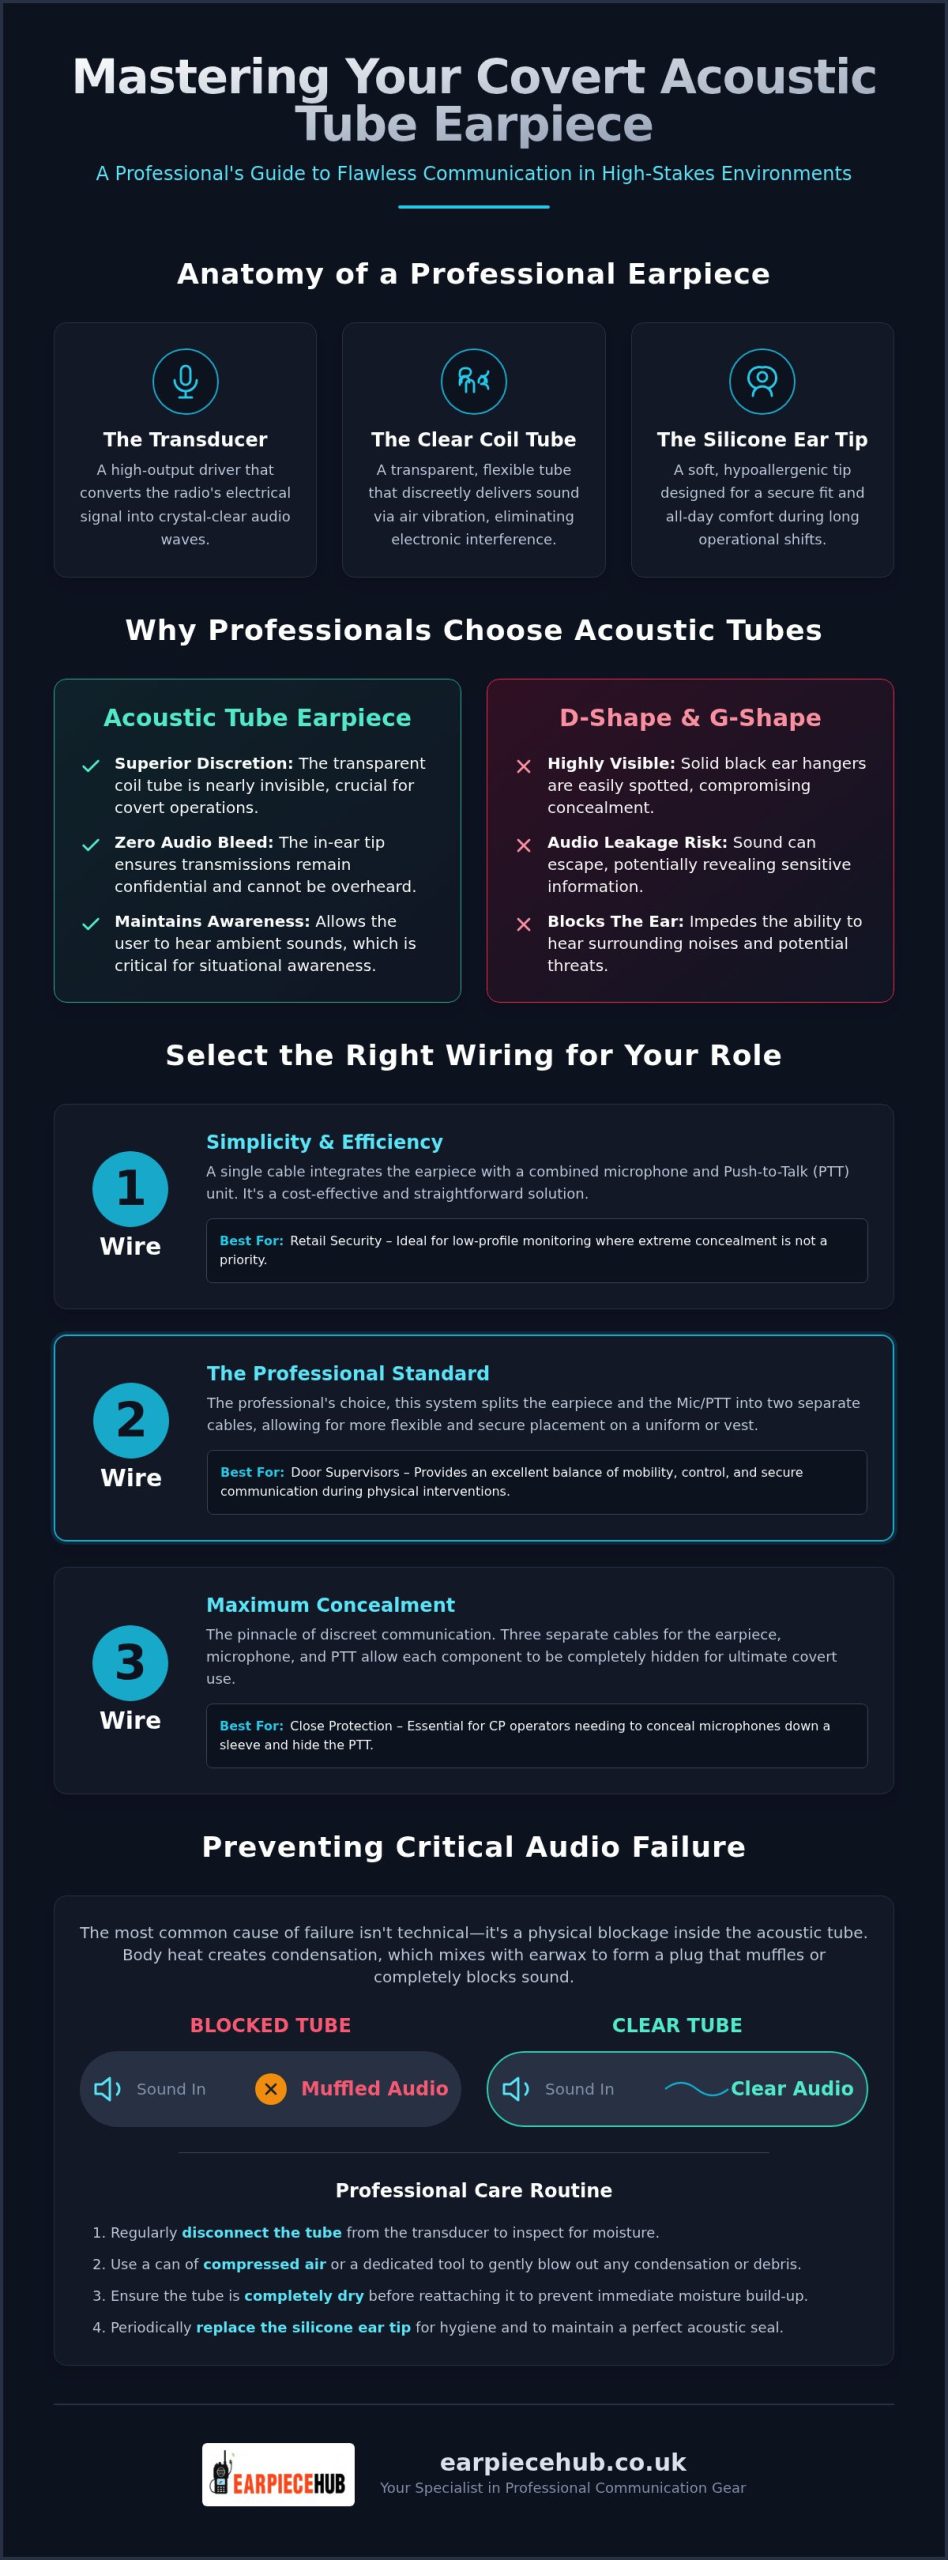
The system relies on acoustic tube technology to transmit sound waves. An electronic transducer, usually clipped to the collar, converts the radio signal into sound. These waves travel through the hollow, air-filled tube, which eliminates electronic interference and prevents the “crackling” often found in budget alternatives. It’s a simple yet effective method that has remained the industry standard for decades due to its reliability in the field.
Every professional-grade unit consists of three primary components:
- The Transducer: A high-output driver that converts electrical pulses into clear audio.
- The Clear Coil Tube: A flexible, transparent lead that remains inconspicuous against most skin tones and clothing.
- The Silicone Ear Tip: A soft, hypoallergenic tip designed for all-day comfort during long shifts.
Why Professionals Choose Acoustic Tubes Over D-Shape or G-Shape
While D-shape and G-shape earpieces are popular in retail environments, they often fall short in professional security contexts. The primary advantage of the acoustic tube is its superior discretion. The clear coil is significantly less visible than solid black ear hangers, which can be easily spotted from a distance. Because the silicone tip fits snugly inside the ear, there’s zero audio bleed. This ensures that sensitive information remains confidential and cannot be overheard by the public. Additionally, these systems support open-ear moulds, allowing you to maintain full environmental awareness whilst monitoring your radio. You won’t miss a nearby conversation or a potential threat because your ear is completely blocked.
Technical Anatomy: 1-Wire, 2-Wire, and 3-Wire Systems
In the security industry, “Wire” refers to the number of physical cables extending from your radio connector. Understanding this terminology is vital before purchasing a covert acoustic tube earpiece. A 1-Wire system uses a single lead for both listening and transmission, often featuring a combined Mic and Push-to-Talk (PTT) button. It’s a simple, reliable choice for those who don’t need complex cable management. 2-Wire systems are the professional standard, splitting the equipment into two separate leads: one for the earpiece and another for the Mic/PTT unit. This allows for more flexible placement on your uniform. Finally, 3-Wire systems offer maximum concealment by putting the earpiece, microphone, and PTT on three distinct cables. This setup is the pinnacle of discreet communication.
Choosing the right wiring isn’t just about functionality; it’s about operational longevity. Proper covert earpiece maintenance ensures your covert acoustic tube earpiece doesn’t tangle or fail during critical moments. You can browse our specialist wiring configurations to find the exact match for your radio model.
Which Wiring Configuration Suits Your Role?
- Door Supervisors: 2-wire systems provide the best balance of mobility and control. You can clip the PTT to a lapel or vest, keeping the mic close to your mouth whilst the earpiece remains secure during physical interventions.
- Close Protection: The 3-wire kit is the only real choice for CP. It allows for complete palm-mic concealment, with the microphone threaded down a sleeve and the PTT hidden in a pocket or waistband.
- Retail Security: Teams often prefer 1-wire simplicity. These kits are cost-effective and provide low-profile communication for store-floor monitoring where extreme concealment isn’t a priority.
Each configuration serves a specific tactical purpose, so ensure your choice aligns with your daily tasks. Selecting the wrong lead count can lead to snagging or restricted movement during high-pressure situations.
Maintenance and Hygiene: Preventing Audio Failure
The most common cause of audio failure in a covert acoustic tube earpiece isn’t a technical fault with the radio. It’s physics. During a long shift, body heat creates condensation inside the clear tube. When this moisture mixes with natural earwax, it forms a physical plug within the acoustic coil. This blockage muffles sound waves, leading many professionals to wrongly assume their transducer has died. Regular inspection is the only way to ensure your communication remains clear and your lifeline stays open.
You should also monitor the physical condition of the plastic components. Over time, polycarbonate tubes will begin to yellow or harden. Yellowing is a sign of UV exposure and sweat absorption, whilst hardening indicates the material has become brittle. If the tube loses its flexibility, it’s prone to snapping during high-pressure movements. We recommend keeping a stock of replacement acoustic tubes and ear tips to ensure you’re never caught off-guard by gear failure. This simple precaution extends the operational life of your main unit.
Step-by-Step: How to Clean Your Acoustic Tube
Cleaning your covert acoustic tube earpiece takes minutes but prevents total failure. Follow these steps: Disconnect by the plastic connector to avoid wire strain. Wash in warm, soapy water to dissolve debris. Use the “Spin Dry” technique by swinging the tube in a wide circle to clear the coil. Finally, sanitise the silicone ear tip with an alcohol-free wipe. Never reattach the tube whilst damp, as moisture will damage the electronic transducer in professional units.
Selecting the Right Earpiece for Your Radio Brand
Choosing a covert acoustic tube earpiece requires more than just matching a brand name. Connectivity varies significantly across model ranges. For instance, Motorola users must distinguish between the standard 2-pin connector found on the DP1400 and the complex multi-pin interface of the DP4400e series. Using the wrong connector can damage your radio’s accessory port or result in intermittent audio. Kenwood and Hytera models also feature distinct pin spacings and locking mechanisms. Always verify if your radio requires a side-entry or top-entry plug before committing to a purchase.
If your team uses a mixed fleet of radios, universal earpiece adapters are a strategic investment. These allow you to use a single high-quality covert acoustic tube earpiece across different hardware brands, ensuring consistent audio quality for every operative. For high-movement roles like close protection or event security, we recommend screw-in connectors. These provide a mechanical lock that prevents the lead from being yanked out during a physical struggle or whilst running. A secure fit is the difference between staying connected and total radio silence.
Why Earpiece Hub is the Professional Choice
We specialise in equipment engineered for the specific rigours of the UK security industry. Our earpieces feature high-durability polycarbonate tubes and Kevlar-reinforced cabling to withstand constant movement. We act as a central resource for your team, providing essential spares like the replacement battery for Motorola DP1400 to ensure your gear stays in service longer. Our technical support is UK-based, providing the expertise you need to resolve compatibility issues quickly. Don’t settle for generic alternatives when your safety depends on clear communication.
Upgrade your communication kit with professional acoustic tube earpieces from Earpiece Hub for guaranteed reliability and technical precision.
Maximise Your Operational Reliability
Professional communication requires more than just high-end hardware. It demands an understanding of the technical details that keep you connected. Much like how Acoustic Vibes Music advises on the importance of quality when moving beyond entry-level instruments, security operatives must prioritise the technical integrity of their audio gear. We’ve explored how selecting the correct 1, 2, or 3-wire system aligns with your specific operational needs. A strict hygiene routine is also essential to prevent moisture-related audio failure. By matching your covert acoustic tube earpiece to the precise pin configuration of your Motorola or Hytera radio, you eliminate the risk of intermittent signals during critical moments.
As a UK specialist retailer, Earpiece Hub provides the technical precision and durable components required by frontline personnel. We offer next-day shipping and 24/7 professional support to ensure your team never faces radio silence. Don’t wait for your current gear to fail in the field. Shop Professional Covert Earpieces at Earpiece Hub and equip yourself with the industry standard for 2026. Stay focused. Stay secure. Stay connected.
Frequently Asked Questions
How do I know if my earpiece is 1-wire, 2-wire, or 3-wire?
You can identify the wiring type by counting the cables originating from the radio connector. A 1-wire system has a single lead connecting to a combined microphone and PTT button. A 2-wire system splits into two separate leads: one for the earpiece and another for the mic/PTT. A 3-wire system features three distinct leads for the earpiece, microphone, and a separate PTT button for maximum concealment.
Why has the audio in my acoustic tube earpiece become quiet or muffled?
Muffled audio in your covert acoustic tube earpiece is usually caused by a physical blockage. Moisture from condensation or earwax build-up creates a plug that prevents sound waves from travelling through the air-filled coil. Disconnect the tube from the transducer and check for debris. If cleaning doesn’t restore clarity, the internal transducer may have suffered moisture damage and requires replacement to maintain professional operational standards.
Can I use a Motorola earpiece on a Kenwood radio?
You cannot use a standard Motorola earpiece directly on a Kenwood radio because the pin configurations are different. Motorola typically uses a 2-pin or multi-pin connector, whilst Kenwood uses a specific 2-pin spacing with different internal wiring. To bridge this gap, you’ll need a dedicated earpiece adapter. This ensures the electrical contacts align correctly without damaging the radio’s sensitive accessory port or causing audio failure.
Are clear acoustic tubes completely invisible?
Clear acoustic tubes are highly discreet but not entirely invisible. They are designed to blend with skin tones and disappear against clothing. For maximum concealment, professionals thread the tube behind the ear and down the back of the neck. This covert acoustic tube earpiece design is significantly less noticeable than solid black headsets, making it the preferred choice for close protection and surveillance operations.
How often should I replace the silicone ear tip for hygiene reasons?
We recommend replacing the silicone ear tip every three to four months, depending on the intensity of your shifts. Daily sanitisation with alcohol-free wipes extends their life, but the material eventually degrades and loses its seal. Swapping the tip regularly ensures your equipment remains hygienic and comfortable for long-term wear. Keeping a stock of replacement ear tips is a simple way to maintain high professional standards.
